20 May, 2009

Spreaders up, Headstay up.


YO! It's been a busy week or two, but I have had some time to get some important projects completed around the boat. Most notably, the new spreaders are all done and are aloft. They look MUCH better than the old ones, and they won't give me a heart attack every time I go sailing. With the new spreaders in place, I was able to take down the old headstay, which had sustained some damage when I came in to the public dock at Old Sac. Next came pulling off the chainplate which had been tweaked in the same incident that required me to patch the stem.
Epoxy is currently curing in the old fastener holes, and once that's done I'll drill new holes for the new chainplate that I fabricated and slam that bad boy in and it should all be downhill from there.
Unfortunately (or more appropriately - fortunately) I recently acquired a Ranger 23, and that has been taking up a lot of my time... At least I can take that one out sailing!
Anyhow, I need to DL some photos and do a little cyber-housekeeping but stay tuned for a full update of the rest of the spreader action, as well as the chainplate and perhaps a little Ranger fun!

cheers.

09 May, 2009

Spreaders done, going up during next 36 hrs

Finish work is done, hardware has been mounted on the spreader that had been removed from the rig, and I am about to mix up some Smith's Clear Penetrating Epoxy Sealer to seal the holes where the clevis pins go through.

Then time to put them in the rig.

Details to follow.

05 May, 2009

Spreader Update

Well, seems there isn’t a whole lot to comment on about the spreader progress recently. The weather has not exactly been accommodating in the bay area as of late, and I have been the victim of a re-occurring back ailment, so progress has not been, shall we say, speedy. Be that as it may, forward progress is being made.

After setting the epoxy fastener slugs, I moved on to coating the spreaders. I’ve always liked the look of varnished spreaders (if you’re going to have wooden spreaders), but varnish isn’t exactly the best defense for the relentless barrage of UV. So I decided to paint the topsides of the spreaders and varnish the bottom.

I taped off the areas that I didn’t think I wanted varnished, and put one coat of Z-Spar Flagship Varnish thinned 50% with the recommended thinner, allowed the amount of drying time prescribed by the label then sanded and put another Flagship coat on, thinned 25%, followed by two coats of 15% thinned Flagship. It was at this point that I broke out the Bristol Finish. After prepping the surface to be varnished, I laid on five more coats, for a total of nine coats.

I then spent at least two hours pulling tape, trying my best not to completely ruin what I had done so far.
Now for the topsides. I taped off the varnish work I had just completed, leaving a slight overlap of the paint over the varnish, to ensure a good seal of the wood. As before, I thinned the first coat of Pre-Kote 50% to ensure thorough penetration, then waited and sanded as directed, following with a full Pre-Kote before two coats of Hatteras Off-White Premium Yacht Enamel.

Then I spent two more hours pulling tape off of the spreaders. I believed that they were ready for the final round.
I busted out my best sandpaper and took those spreaders to town. Once deemed ready for tape, they were cleaned and wiped down, then got taped for some varnish, allowing an overlap of the varnish over the paint. Unfortunately, they were left out on a damp night in what would have been their final coat, so they ended up getting one last go-round in the varnish department.

More removal of tape ensues.

Followed by more sanding.


More application of tape ensues, this time overlapping the painted areas over the varnished areas by about two millimeters, as before.

That, I believe, brings us to tonight’s proceedings.

With the [varnished areas of the] spreaders fully taped off, I mixed up some Hatteras thinned 10% and put on just about as thick a coat as I could before any sagging occurred. They are, as I type this, drying in a shed shoreside. I figure: it’s Tuesday, I’m not going to be able to put them up until Saturday, so, might as well put one more coat of paint on them… so it’s possible that one more coat goes on, but I may become impatient and just start putting the mounting hardware on, given that I would have to wait sixteen hours just to get to sand them...

21 April, 2009

Oh So Close...


It's been an admittedly (read: absurdly) long time since I last posted any sort of status report here and for that I apologize. The good news, however, is that during my taciturnity1 there has been much progress. Jody Boyle of North Bay Boatworks turned out some beautiful spreaders (okay, they weren’t turned, but they were beautiful nonetheless), I bought a Chart Light and ended up completely rewiring the Main DC Distribution Panel, and I got a new tiller. Depending on what the weather does this week, I may be able to finish the final bits of prepping the spreaders and put ‘em up this weekend.

The call I had been waiting for had finally come ringing. My spreaders were finished! They were even more awesome than I had expected them to be, and gladly paid the modest fee to the first-class shipwright who had wrought them. I could hardly bring myself to take them to the drill press with a 5/8” bit, but I knew what had to be done. Having been dismasted twice (well, three times if you count the number of masts) within twelve months I have become exceedingly skeptical about anything rig related. Seeing as how the spreaders take a fairly hefty load, wanting nothing left to chance, I set about making them as beefy and water resistant as possible. They are secured to the mast with two triangular plates that are through-bolted in six places, with two holes bored out for 1/2” clevis pins. The pins are placed through the spreader tangs and the spreaders and then secured with cotter pins. I began by slugging the six through-bolt areas with 5/8”ø slugs, then taped and treated the bottom with seven coats of Bristol Finish on top of two coats of Z-Spar Flagship Varnish thinned 50%, sanding between coats as needed. I’ve got two coats of Pre-Kote and one coat of Hatteras Off-White yacht enamel on the top, with two more Hatteras coats coming in the next two days (weather withstanding). With the topsides done, I’ll sand the varnish down nice and smooth and lay one last thin coat of Bristol down, with a little lip over the enamel to make sure they’re nice and sealed. Then the plan is to drill the Clevis Pin holes and penetrate the holes with Smith’s Clear Penetrating Epoxy Sealer. There wasn’t really enough meat around the holes enough to put an adequately sized high-density epoxy slug, so I’ll seal it up nice ‘n good with the Smith’s. As for the tips, they’re not as complicated since the fitting that goes there takes up the majority of the load, and the fasteners only see a minimal amount. So, the two wood screws that hold that fitting on will get a little Sikaflex 291 to make sure that there is no water penetration, but that is about it. If all goes well, I’ll have fancy new spreaders in my rigging to show off on Sunday.

The importance of red lighting at night can’t be overestimated in my opinion, so I got this fancy chart light that has a red lens. It’s mounted on the end of a 500mm arm, and has a very low amp draw (for an incandescent light). I was very excited when I got it and, understandably, wanted to put it in right away. I got some duplex safety cable (the kind with red an yellow conductors) and pulled it from the locker where the fixture was located to the distribution panel. Then I tried to find a place to plug it in. I had been putting off any kind of electrical projects until I was done with the rig for a couple of reasons, and not small among them was the fact that the back of the panel was a total rat’s nest. The good news is that there was mostly new cable, but it was in a tangled fire waiting to happen. I didn’t have it in me to contribute to the nest; and half felt like if I did anything that wasn’t fixing it, the whole thing might just disintegrate or catch on fire. Or both. So I went back to the store. And then I spent two days crammed in the lazarette installing a new ground (sub) bus, a new positive bus, a few terminal strips here and there, and a couple of sub busses for the cabin lights and accessory circuits, crimping countless terminal connections, and sealing the heatshrink while only burning myself once. I don’t think I could feel my legs for half the time, but now I have the foundation for a solid 12VDC infrastructure, and won’t worry about it spontaneously combusting.

It had occurred to me at some point that I needed a new tiller, the old one having succumbed to rot and ultimately meeting its demise during a crucial maneuver in confined waters. I broke out the tape measure and scoured the internet, and eventually found a pre-fabricated tiller for an Ericson 27 at Annapolis Pro Sailing for a very reasonable price. They were out of stock when I placed the order on the internet, and received a call on the following business day to let me know that while they didn’t have any in stock, APS would call the manufacturer to check if they had one. Turns out they did, and it was drop-shipped to me, arriving yesterday. It looks like there is a crack in the top layer of mahogany, and I am going to call the manufacturer to see if I can exchange it. I’ve just been pretty busy during east coast business hours of late, and haven’t had a chance to do it yet. Hopefully I’ll get to that tomorrow or the next day.

That just about covers the recent goings on here, but with the preliminary deadline looming there should be plenty more happening within the next few weeks. Once I get the new spreaders up, then the forestay will come down and get sent to Svendsen’s for duplication, and whilst that is happening I’ll mount the new forestay chainplate that I fabricated. With any luck, somewhere in there I’ll build a new forward hatch and noodle out all the traveler bits and the reef lines, and then its all sailing.


1 Thanks Ms Bradley.

16 February, 2009

Spreaders in the Works!


Last night saw a pretty gnarly front roll through the Bay Area and pack some decent sustained winds as well as dump a bunch of water. Seeing as how I had just pulled one of my precious spreaders down and replaced it with a 2x4 cut to length and pretty much just wedged in there, I was fairly apprehensive when the first frontal wave washed through. Around 0300 the storm brought it. The way my particular marina is situated on this particular bay lends itself to pretty severe exposure to any sort of southerly weather. Winds blow up from the south bay, split around the city and then converge at the mouth of Richardson Bay, where they continue to be funneled through a bottleneck where my slip is. Combine this with a fetch all the way to San Jose and it makes for a wild ride. Winds sustained in the mid-thirties for a few hours, gusting to the forties, with 3-4 foot wind waves rolling headlong into my slip. Needless to say I didn't get much sleep last night. It did, however, make for a pretty good test of the temp spreaders. I think they'll hold out just fine, but the ride's not over!

I dropped off the spreader that I removed yesterday at North Bay Boatworks, and a fancy new one is being made as this is being typed! Looks like this project came along just in time as the spreader I removed was a little farther along the rot express than I had originally surmised. Hopefully it won't take too long for them to be made, and then they'll be stronger, lighter, prettier than they ever were!

Until then there are plenty more projects to attend to, and with the weather systems stacking up like they are I'm not likely to get very much done :-(

Here's the unfortunate weather synopsis for the next week:
.SYNOPSIS FOR THE CENTRAL CALIFORNIA COAST AND BAYS INCLUDING
MONTEREY BAY...
GULF OF THE FARALLONES...AND CORDELL BANK NATIONAL
MARINE SANCTUARIES...

A PERSISTENT LOW PRESSURE SYSTEM CENTERED JUST OFF OF THE
CALIFORNIA OREGON BOARDER IS MAINTAINING SOUTHERLY WINDS ACROSS THE
COASTAL WATERS. STRONGER SOUTHERLY WINDS WILL CONTINUE OVER THE
SOUTHERN WATERS THROUGH LATE TONIGHT EARLY TOMORROW MORNING. SHOWERS
AND THUNDERSTORMS WILL ALSO BE POSSIBLE TONIGHT IN RESPONSE TO
THIS LOW PRESSURE SYSTEM. POST FRONTAL THUNDERSTORMS WILL ALSO BE
POSSIBLE TOMORROW AS COLD AIR FILLS IN BEHIND THIS DEPARTING SYSTEM.
WINDS WILL REMAIN SOUTHERLY AS THIS SYSTEM MOVES ONSHORE AND YET
ANOTHER PACIFIC STORM SYSTEM APPROACHES THE COASTAL WATERS.

$$
SAN FRANCISCO SAN PABLO SUISUN BAY AND THE WEST DELTA-
252 PM PST MON FEB 16 2009

SMALL CRAFT ADVISORY IN EFFECT THROUGH LATE TONIGHT


TONIGHT
S WINDS 15 TO 25 KT. SHOWERS AND SLIGHT CHANCE OF
THUNDERSTORMS.

14 February, 2009

quick note


Just a quick note to say that I got the last two of the six double D1 rope clutches installed, pulled one spreader down (a little nerve wracking to have a janky temporary spreader kludged in there), and I've begun mocking up the new dodger. I'll get some shots of the new deck hardware and assorted rigging bits, as well as write updates on the spreader and dodger action as new developments come to light.

Major Update


As I've said before, Moor'ea sat for a long while with very minimal care in a relatively harsh environment. Much of the deck hardware was pretty shot, but worked well enough to cruise around the Delta for a spell. The goal, however, is to get the boat prepared for the rigors of San Francisco Bay and the North Pacific Ocean - neither of which are forgiving in the least. So, pretty much every block, line, clutch, cam and jam cleat got removed once I settled in down in Sausalito. This made for a nice blank canvas and lots of options. I also don't really want to have to rely on other humans to go out sailing for an afternoon or weekend, so singlehandability was the priority. I wanted the loads to be light (in terms of how much effort it takes to sheet in a line), so there is a lot of purchase in most control lines. The designs are sort of a hybrid of dinghy and small racing keelboat setups. I also wanted things close at hand so every control line, halyard and the first reef are being led back to the cockpit. With the traveler and double-ended mainsheet already there, the real estate aft on the cabin top went fast! It took months of noodling, doodling and pouring over catalogs until I finally had it figured out...

Meanwhile, I set about taking care of other general tasks that needed attention.


Rigging/Deck Hardware Refit
• Relocate/Reinforce Traveler (see note 1)
• Install Mast Base Blocks (for Gadget Plate)
Install Clutches
• Relocate Cabin-Top Winches
• Replace, relocate Deck Organizers
• Re-bed Toe-Rail Tracks
• Design, install Cunningham (see note 2)
• Design, install Outhaul (see note 3)
• Design, install Vang (see note 4)
• Replace all Running Rigging (see note 5)
• Replace Mainsheet Cams
• Modify/Install Bow Pulpit (see note 6)
• Modify/Install Stern Rail (see note 6)

General Projects
• Replace Bilge Pump
• Thorough Cleaning (three days worth!)
• Overhaul Top-End of Atomic 4
• Replace LPG Tank & Regulator
• Replace Starting Battery
• Replace Battery Charger
• Inspect Rig (see note 7)
• Replace Mooring gear (see note 8)
• Re-bed Deadlights
• Mount VHF
• Install Stereo
• Refinish Washboards
• Refinish Handrails

SO, I think that just about does it for projects completed thus far. If I think of anything else I will add it to the list. There are still a few major hurtles to be over come, but I think I'll clear 'em.

Outstanding Hurtles
• Replace Spreaders (see note 9)
• Replace Forestay & Tang
• Mount new Range (see note 10)
• Finish Traveler
• Make new Tiller (the previous tiller blew up one night in the delta while dousing sails in a narrow river)
• Make new Forward Hatch (the original one blew away in an 84kt gust during a storm)


Once those few hurtles have been cleared then it should be smooth sailing, literally!

NOTES
1. The traveler had pulled up through the bottom layer of fiberglass one the port side of the deck - my traveler is mounted above the companionway - obliterating the defenseless balsa core. The area was also slightly damp. I dried out what dampness there was and filled the holes with West Systems Epoxy fortified with 404 High Density Filler. I then relocated the traveler 3" forward of its original location. I did this for three reasons: for one there could be the possibility of braining yourself pretty good on it; two I wanted to mount some instruments aft of the traveler over the companionway and felt that there wasn't enough space with the traveler in its original location; and three because I didn't trust the area of the deck where the damage had occurred. So, to avoid a similar event, I proceeded to create epoxy slugs where the fasteners would go through deck. I achieved this by drilling out a 5/8" hole centered where the fastener would be. I used the same concoction of West Systems with 404 and filled the holes I'd just drilled. I like to give epoxy a good cure before I sanding, so I left it to cure overnight and sanded, drilled and fastened the traveler in place the next day, using some Sikaflex 291 FC to bed it down. I'm a big fan of the epoxy slug. All the compression load from the fasteners is transferred to the epoxy from the balsa core, and it spreads out the tensile and sheer loads over a larger area.

2. Cunningham is an 8:2:1 Cascade with 8mm v100 and 6mm Amsteel

3. Outhaul is a 3:1+4:1 Cascade with 8mm v100 and 6mm Amsteel

4. Vang is an 8:2:1 Cascade with 8mm v100 and 6mm Amsteel

5. Halyards are 9.5mm Warpseed, Mainsheet is 9.5mm Salsa Line, and the Traveler is 6mm Sta-Set

6. The boat came sans pulpits and stanchions. I was able to acquire 4 sets of stanchions and bases as well as a Bow Pulpit and Stern Rail from an Ericson 27. Oddly enough they were both too big and required some modification before they would fit correctly. The Stern Rail only needed a minor adjustment to the two forward legs, though none of the legs corresponded to the molded-in mounting pads. The Bow Pulpit, on the other hand, required a bit more effort to coax into place. With some judicial whacking here and there I managed to get the thing to fit onto the factory mounting pads (more critical up forward due to sealing issues with the waffle pattern non-skid), and perhaps even more impressive, I managed to get the fastener holes to line up with the originals, negating the need to fill & drill new ones!

7.. The standing rigging was replaced before the stint in the delta, and saw very little use, and was in a fresh-water environment. Thus, it was not in very bad shape. The forestay needs replacement before any sailing, but the rest will do 'till they get swapped out in the near future.

8. I spent the first 8 months I had the boat on the hook, so ground tackle was an important issue to me. The primary setup is a 16lb Danforth with 50' of 5/16" chain and 250' of 5/8" Megabraid. The stern/lunch hook is an 8lb Danforth with 25' of 1/4" chain and 175' of 1/2" Megabraid. The primary hook will most likely be upgraded to a 25lb CQR for venturing outside of the Bay. For the Bay and Delta the Danforth style anchor has served me very well. When funds become available the Danforths will get swapped out for Fortress anchors of equivalent size.

9. I was on a boat last summer that had a :wooden: spreader fail, which resulted in a dismasting. This catastrophe was compounded by the fact that the boat was ketch rigged. The spreader failed due to poor tang design which allowed water to penetrate into areas critical for structural integrity, as well as difficult to impossible to detect water intrusion. The insurance surveyor that looked over the boat after the incident was skeptical that the damage was not visible until he saw the spreader and agreed. So, I'm not willing to risk having the rig come down because if a rotten spreader. One of the spreaders has a gnarly crack where it attaches to the spreader tang so I have no hesitations about having new ones made. I opted to go with wood again due to cost, and because I like the way wood looks. My friend's spars and spreaders came out beautifully, so I'm having the same shop whip me up some new ones. They should be ready in about a month (they've been pretty busy building boats!).

10. I got a Stove with Oven to put into the galley, but it's a completely different size from the two-burner Force10 drop-in. So I'll have to build a new 'bulkhead' onto which the gimbal brackets can be mounted, as well as refinish the countertop.

the Atomic 4 Lives Again!


Engine Overhaul

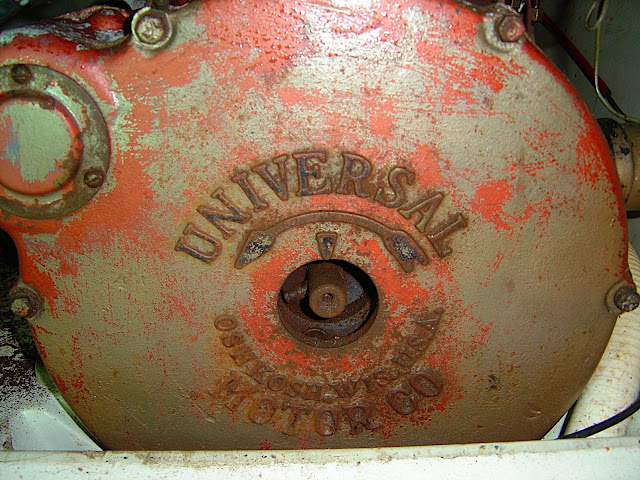
One of the big, important tasks on the plate early on was to get the venerable old Atomic 4 running again. Budget considerations precluded any sort of fancy new diesel engine, so resurrect the Anemic 4 it was!

I had already figured out that there wasn't a useful amount of fuel making it to the combustion chamber, no spark, and no compression in any of the four cylinders. Sweet. I pulled the head and found that all four exhaust valves were stuck (read: rusted) in the open position. I also found a rather disturbing amount of water in the Nº 4 cylinder, as well as a small amount in Nº 3. Once I got into the exhaust section I noticed that the water mixing elbow - which, in normal circumstances, should direct the flow of cooling water down the exhaust pipe into the muffler - was actually on the manifold side. Great. At least I knew why it stopped running in the first place.

So, six months and a whole mess of Pb-Blaster and Marvel Mystery Oil later - not to mention some judicious hammering - the exhaust valves were once again free. The inlet valves weren't too bad to begin with and came out with only minor coaxing. I took the head down to my local machine shop and had the surface milled and had it primed for painting. The block got as much of a work-over as I could give it without actually removing it from the boat. There was a heavy amount of scaling on the water jacket side of the motor, which was taken care of by some of West Marine's "Rust Lock Metal Prep", a sort of purple liquid which converts iron oxide to iron something else, and allowed it to be scraped off, primed and painted. Normally this stuff turns the rusty areas a deep black, but in the case of the Atomic 4 it ended up turning all the rust into a white powder. My guess is that due to the fact that the Atomic 4 was cast in some sort of unique alloy that was supposed to be resistant to corrosion. Given that the motor sat a sailboat that was primarily in salt water for 40 years I think it was doing okay. With a fresh coat of primer and paint, it should be good to go for another 40 years.

Now for the fun part... Putting it all back together.

I became a fan of Moyer Marine, the east coast operation that deals specifically with Atomic 4s. They have a number of parts for sale that are otherwise relatively unobtainable. So, I got a new water jacket side plate, with new and improved water directing technology, new valve cover, water pump overhaul kit (which included a new shaft, impeller and cam), as well as the extend-o-bolt to allow easier maintenance of the pump, new stiffer valve springs, and a carburetor overhaul kit. Oh, and a new oil vent cap. Oh, and a new thermostat and thermostat housing. From West Marine I got all new water hoses, raw water strainer, fuel water separator (the beefy one!), and various fittings to make a rig for flushing the engine from a bucket or dock pressure.
I rebuilt the carburetor with all the spiffy new parts from Moyer, hooked up the fuel and water lines with their respective new goodies, put the (original!) valves back in with the new springs, closed 'er all up and crossed my fingers.

After some fiddling, she fired up! Man, what a fun day that was! Six months, about $1000, lots of cursing, as many bloody knuckles and a few beers was all it took!

Check out the shots here. (unfortunately my camera died around the time that I finished this project so there is no 'after' shot yet)

Here is a list form of the work done to the engine:
• Ignition Coil Replaced
• Plugs/Wires replaced
• Points replaced
• Carb rebuilt
• Thermostat/housing replaced
• all Brass Fittings replaced
• H20 Pump rebulit (new cam, seals, impeller, cam, 'easy' fastener)
• Hoses replaced
• Exhaust mixing elbow replaced
• Head Magna-fluxed, surface milled,
• Valves removed, cleaned, seats lapped, reused
• Valve springs replaced with stiffer springs
• Raw H2O Strainer
• H2O jacket side plate replaced
• new Diverted flow "t" inlet
• Fuel/Water Seperator replaced
• Fuel Shutoff valve installed
• Cleaned, Primed, Painted,
• Oil Changed

Coming Back To Life


This is the story of Ericson 29, Hull Nº5.

She was designed by Bruce King and built in 1970 in Costa Mesa, CA.

She spent the early years of her life plying the waters of San Francisco Bay and the Sacramento and San Joaquin Rivers Delta. She then moved to Moss Landing, CA, sailing the waters of Monterey Bay. Gradually she was taken out sailing less frequently and eventually was trucked to the Central Valley for some hull work. After airing out in the dry valley air, some cosmetic blisters were repaired, and she got a seven-layer epoxy barrier coat and fresh bottom paint. The ol’ Atomic 4 got some attention, including a new hot section of exhaust. To top it all off she got new standing rigging. She splashed in the mid-Nineties, and motored to Disappointment Slough to hang on the hook near the Eden Isle Yacht Club and be a nice getaway spot for some Delta fun.

Over time she saw less and less attention and a series of unfortunate events befell upon her. Some vandals came by and slashed a bunch of halyards to get to the inflatable that was lashed to the foredeck, and stole the VHF and stereo. Apparently some time later she had been the home to a roost of some kind of bird, I don't remember which. The result of which was a trashed interior. I still find weird nesting material in deep nooks and crannies, and all the interior cushions were total write-offs. Bummer. Those are expensive.

The boat became available to me in 2006, and I was eager to take care of her and nurse her back to health. She had been my Dad’s boat and I had gone sailing on her when I was 10 days old, and many times after that. Sailing on Moor’ea were some of my fondest memories, and I couldn’t wait to create some more.

I had been warned that she was probably going to be very dirty, and I wasn’t let down. She was filthy. Outside she was covered with thick splotches of dark green moss that had a very tenacious grip, and general dirt and dust that had blown over the levee from the surrounding farmland. The probability of disturbing a wasp’s nest was very high when moving anything that could have a little crevice to hide one. Inside there was mold and mildew on just about every surface - great for the allergies. Spiders and wasp’s nests were everywhere, and a fair amount of farm dust had made it down below as well.

I brought with me an old car radio and plugged it in to the spot where the old one used to be. Gotta have tunes! Once I had the stereo installed I realized that the speakers were blown. Sweet. I had also brought with me a new VHF and plugged that in where the old one of those used to be. Check, Check, uh, Anybody copy, over? Cool. Communications, check


After I got the stereo installed, the next task was to clean her up. Some knuckle skin, lots of biodegradable boat soap, a healthy dose of bleach and we were on our way. Getting that green mossy stuff out of the waffle pattern in the nonskid was a real joy. Three days later and the boat was sparking clean (sort of).

Now to see about that engine. Let’s see… Spark? Negative. Compression? Negative. Fuel? Not really. And it looks like the mixing elbow was installed backwards and the water was channeled into the exhaust manifold. Buh. Good thing the Nissan 8 runs well.

Among the other gear I brought were an array of blocks, halyards, sheets, medical supplies, tools, personal gear, safety supplies, charts and other various goodies. I set about rigging up the boat in such a way that I could at least put the sails up and putt around. I knew that this would all be temporary as I wanted to lead a few more things back to the cockpit, and generally redesign the running rigging.

An inspection of the standing rigging was what I'd expected of 15 year old wire in the Delta. Some corrosion, but nothing totally bad. It'll do till I'm ready to replace the rig.

With all those details attended to, I was ready to cruise Moor’ea around the Delta for a tick before she settled down in Sausalito for a spell.

We went from Disappointment Slough down the San Joaquin River to Three Mile Slough, though to the Sacramento River, where I got to open my first bridge! It had been pretty much upwind for most of this, so we’d just been motoring. The outboard seemed to do an okay job of battling the wind and current, although when the current really hammered us we would only make about 1.5 kts over the ground. But with the right turn into the Sacramento the wind was now on our port quarter, so we put up the sails and turned the motor off. I didn't have to wait long before I had to hail the bridge operator in Rio Vista to open my second bridge! Then another right into the Old Sacramento River and went all the way up to Sacramento. I hung out there for a week, kicked it with friends, saw some of the Jazz Jubilee and had an all around good time (except when I dropped my phone in the water). Then back down the river all the way to Berkeley where I spent a couple of nights, then turned around and went back up to the San Joaquin to check out some more of that. Then I had to go back to work so we headed back to Sausalito and dropped the hook.

Unfortunately, I didn't have a camera for the whole trip, or for much of the early stuff for that matter. What I do have of that trip is here.

Anyway, I'll get to work on posting the engine overhaul!

This is just a test.

testing and hello.